Our sailmaster offers some tips for making repairs to your sails while out at sea and points out what damage to watch out for on your sails
During last year’s ARC I was to be found at one point on the pulpit restitching the foot tape of our headsail. I was clipped on a short tether with one hand on the boat. The spinnaker had been pinned too tight and had rubbed through the stitching of the furled headsail.
The sail was progressively furled up so the damage was in reach and it was surprisingly easy to rethread new stitching through the existing holes – and the repair was good enough to stop the damage spreading. That really was a repair on the fly.
Not all sail repairs are so accessible and straightforward, but there is no reason why most problems can’t be solved at sea with a reasonable repair kit. Losing the use of a sail could cost days on a long passage, so it’s well worth giving some thought to what can be done, and what you have to hand.
Seam repair
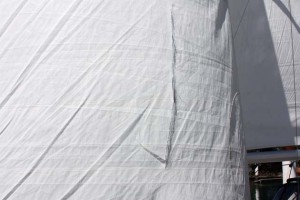
Remember ‘a stitch in time saves nine’, and this is never more true than when in the middle of an ocean! As part of routine daily deck checks, take time to give the sails a once over and check to make sure no seams are starting to come apart – it really doesn’t take long for a seam to ‘unzip’ itself right across the sail. If you see any loose stitching don’t hesitate to get the sail down and fixed; it can potentially save a big headache later.
Stitching a long seam back together is a longwinded and laborious process, but it is much easier than dealing with ripped fabric. With a seam it is just a case of working your way methodically back through all the holes. Find a comfortable place on deck to work as it may be difficult to manhandle a large sail down below.
- How to build a website with WordPress and what are the best plugins to use: WordPress Web Design Tutorials: How to build a website with WordPress and what are the best plugins to use. Building a website with WordPress is an excellent choice due to its versatility, ease of use, and a vast array of plugins that enhance functionality. Here’s a comprehensive guide to building a WordPress website, along with recommendations for the best plugins.
- The Most Important Stages and Plugins for WordPress Website Development: Developing a WordPress website requires careful planning, execution, and optimisation to ensure it is functional, user-friendly, and effective. The process can be broken into key stages, and each stage benefits from specific plugins to enhance functionality and performance. Here’s a detailed guide to the most important stages of WordPress website development and the essential plugins for each stage.
- What are the most powerful Tools for SEO in WordPress?: Powerful SEO Tools for WordPress: Search Engine Optimisation (SEO) is essential for improving your WordPress website’s visibility in search engines. Here are the most powerful tools to optimise your site effectively:
- How to add shipping modules in CubeCart: Step 1: Log in to Your CubeCart Admin Panel: Open your web browser and navigate to your CubeCart admin login page. Enter your username and password to log in.
Step 2: Navigate to the Extensions Section: Once logged in, go to the left-hand menu and click on Manage Extensions. From the dropdown, select Extensions.
Step 3: Find Shipping Modules: In the Extensions section, locate the Shipping tab to view available shipping modules. You can browse through the list or use the search function to find a specific module. - Gathering domain and IP information with Whois and Dig: In the digital age, understanding the intricacies of domain and IP information is essential for anyone navigating the online landscape. This article explores two powerful tools—WHOIS and DIG—that help gather valuable insights about websites and their underlying infrastructure. Whether you’re a cybersecurity professional, a web developer, or simply curious about online resources, you will learn how to effectively utilize these tools, interpret their outputs, and apply this knowledge to real-world scenarios.
- What are the best WordPress Security plugins and how to set them up the best way: Read a comprehensive guide on the best WordPress security plugins and how to set them up to ensure optimal protection for your WordPress site.
- Will a headland provide enough shelter?
- Learn How To Purchase Your Own Domain Name with Fastdot.com: Open your web browser and go to Fastdot.com. Navigate to the Domains section, either from the homepage or from the main navigation bar.
Step 2: Search for Your Desired Domain Name: In the domain search bar, type the domain name you want to purchase. Fastdot supports a wide range of domain extensions (TLDs), such as .com, .net, .org, .com.au, and many others. Click the Search Domain button. The system will check the availability of your desired domain name.
For a particularly large repair it may be necessary to have two people working together, one each side of the sail, so that they can pass the needle back and forth to each other. This is useful where the damaged part is in the middle of the sail.
Common areas of damage
- Spreader and rig chafe – When sailing downwind the mainsail spends a lot of its time resting on the rig. On Skyelark we have a straight spreader rig, which is more forgiving than swept-back spreaders, but even so we still pad our spreaders with pipe insulation and have reinforcement patches for the spreaders at each reef point and on the batten pockets.
- The bottom of the headsail where it exits the foil, and foil segment joins – You may be able to lower the halyard enough to reach the damaged section then reinforce with sail repair tape, but If conditions don’t allow, then keep a wrap or two in the sail to take the pressure off the damage.
- Spreader ends, and anything mounted on the front of the mast can be a hazard – Ideally reinforce the sail and fit smooth cages around protrusions. We also wrap foam round our spreader caps on long passages.
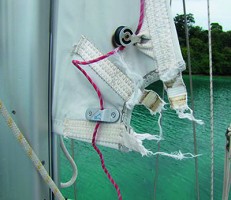
- Clew rings and webbing – A couple of times we have seen the stainless steel clew rings on mainsails part. As a short-term fix you could simply sail with a reef in, or for a longer term solution we have stitched in a webbing loop. Soft clews also fail, but it’s relatively easy to stitch the webbing, with the help of a sailmaker’s palm.

- Spinnakers – Anything sharp is a hazard, particularly near the boom if you do letterbox drops, so check everything is taped up. Spinnakers also like to get caught between the shrouds above the spreaders; you can close off this gap with bungee.
Repair kit
Having a good sail repair kit on board is a must for long-distance cruising. As well as standard sailmaker’s needles, we also keep a good selection of ordinary embroidery needles as we find the larger needles too big for the majority of small repairs.
You will also need good strong cottons of various sizes, a sailmaker’s palm and a small pair of pliers for getting through tougher, reinforced parts of the sail. In addition, sail repair tape for both Dacron and spinnaker materials, larger sections of sail repair material, webbing and Venture tape are essential to have on board.
Hints and tips
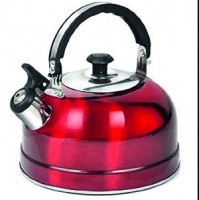
- The bottom of a hot kettle can be useful to get the sail repair tape to bond well onto the sail.
- Round off the corners on any patches so they are less likely to try to peel off.
- Reinforce any loose stitching immediately.
- Tape over any split pins or sharp points around the boat that could be snagged by the spinnaker.
- Have a sailmaker service your sails before any long trip to check for wear and tear and identify any weak points.
- When you put reefs in the main, make sure the lines aren’t trapping any part of the sail, as this can cause wear or make a hole in the fabric.
- Tape both sides of the repair for extra strength.
- If taping just one side of the sail rub chalk (or any powder) onto the opposite side to absorb the glue where the join isn’t perfect, to stop the sail sticking to itself.
Patch repairs
For any repair that is not on a seam, a patch fix is going to be required, and for anything except spinnakers then a Dacron patch is the best thing to use. It even sticks very well to many exotic and laminate sails on the film side, but not on some silicone-covered or resin-based sails so check what you have. Dacron repair tapes come in various thickness rolls and you can buy larger sheets.
Preparation is key and, along with patience, forms the basis of a satisfactory and long-lasting repair.
- Clean and dry fabric. You need to get rid of any salt, so begin with a freshwater rinse, then allow to air dry thoroughly. If time is an issue and you’re not blessed with tropical sunshine use a towel and a hair dryer. Next remove any other residues with rubbing alcohol – this will also help dry the material as it evaporates.
- Prepare your work space. You need to be in a safe, dry, comfortable place with a flat surface to work on – in an ideal world that would be below at the saloon table, but if that’s not possible try a chopping board, or even bring a bunk/sole board on deck for bigger repairs.
- Line up the sail. Usually ‘white’ sails tear in lines that can be pieced together to maintain the same shape, but these should not be pulled overly close together or made to overlap or the shape will change and create loading. If the tear has gone off in different directions do the longest first.
Sails are not naturally flat, they are made up of panels to create a depth which can make laying it on a flat surface problematic. You need to experiment with temporary folds and tucks in the cloth away from the tear to get it to lie as flat as possible.
Lay over the patch or tape, starting at least 5cm away from the start of the tear, smooth it down gently making sure there are no high spots or creases in the patch. If you find it impossible to avoid forming a crease, cut the tape and carry on with a new piece, overlapping the original again.
When cutting the repair cloth, radius the corners so that they are less likely to get caught and pull off – we like to apply a gentle heat and pressure to the patch to help it really stick – if you have a travel iron on board that’s ideal; if not a warm kettle or heavy-bottomed saucepan works well through a dry tea towel.
If it’s in a high load area (close to the edges or a corner) or you have a long way to go, consider beefing up the repair with another layer on the other side. If you do this it is tempting for aesthetic reasons to use the same size patch, but this will create a weak spot and a crease point in the sail, so make it a different shape. Keep an eye on it and it should last well, but not forever so don’t fix and forget – you still need to find a sailmaker, and you probably have a feel for how urgently.
The main difference between your repair and that of the sailmaker is a stitched border, which you can do yourself at sea and once you have come this far, and the sail is in front of you this is worth doing if you still have an ocean to cross. Ideally this should be in a zigzag pattern around the outside of a patch. A sewing machine would be great, but it can be done by hand.
Spinnakers
For small holes and temporary fixes sticky back spinnaker repair tape is fine, but for larger and more significant repairs we prefer to tape on a new patch with double-sided sailmaker’s tape (Venture is one brand). Many new spinnakers are no longer stitched and are assembled purely with tape, so there is no reason why a repair cannot be as good as new.
The aim is to keep the panels the same shape as the original. Don’t try to ‘close the wound’ if fabric is missing, the cloth should stay in the same place as it was before to avoid generating unnecessary loads and stress lines – don’t worry if there are bits missing as the patch will now completely take over and any sail inside it is redundant.
Use the same weight of cloth for the patch so it moves and stretches together – which is something spinnakers like to do. If you put stronger, heavier fabric to repair a lighter one it will create point loading at the patch edges, creating a weak spot.
If the tear passes through a number of panels, then make the repair in stages, one panel at a time. This allows each panel to move and stretch as it was designed to.
For larger repairs, use small strips of sticky back fabric to tack the repair in place – and where there is a gap in the cloth you can even stick down to the surface underneath to hold the whole section steady for applying the main patch.
High-tech sails and creative repairs
For high resin and silicone-based sails, like North 3Di, the most common method for repairing at sea is to use adhesive silicones. These are flexible and incredibly strong and, depending on the load area of the sail, it can be back up in a couple of hours, although should ideally be left and pressed together for 12 hours.
I’ve read several blogs about Volvo 70 crew fixing top-of-the-range North 3Di sails in a couple of hours with 5200. A boat on the ARC last year did an excellent repair with Sikaflex and sail ties. As with a conventional repair, a clean, dry and flat sail is the key to success as well as using a patch of similar material.
Even with conventional sails sometimes you don’t have the time or the equipment to make a proper repair and sometimes (mostly) duct tape isn’t enough. The same ‘cheats’ can get you moving again, but it may require more work to put the sail back to normal in the loft.


